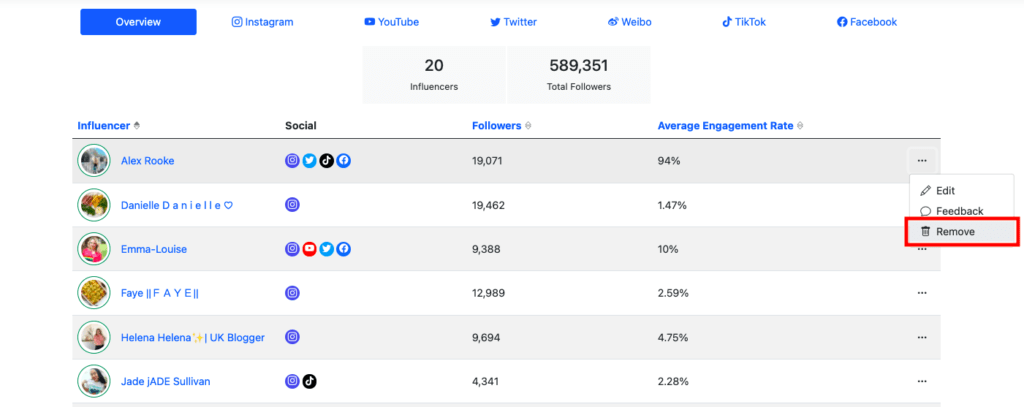
The My Influencers tab at the top of the WeArisma dashboard is your team’s full record of influencers. You can add anyone that you’re working with as well as anyone that you want to monitor. Influencers will be automatically added to your My Influencers when you add them into a List or Activity, or when you upload them to the WeArisma Platform.

If you have a long list of influencer handles and you want them all added, we can help you do this in bulk. Please email with your list and account details and we’ll add them all for you.
If you click on any Influencer name on the WeArisma platform it will take you to their Influencer Profile. Here you can analyse an influencer by looking at their demographics and performance metrics.
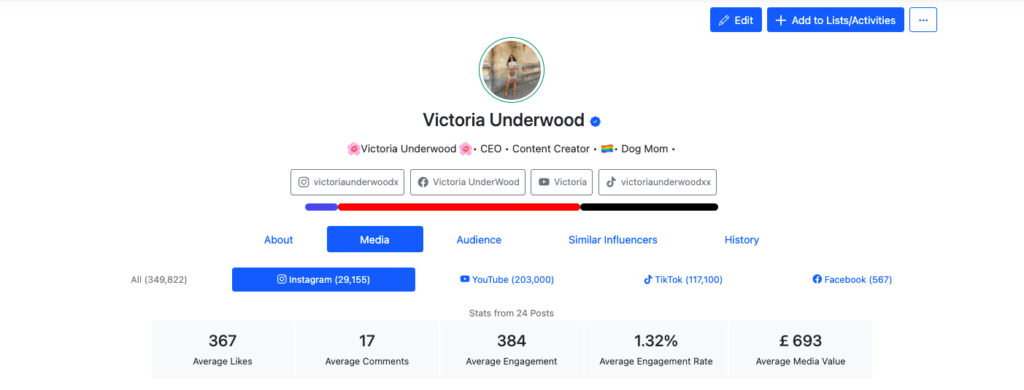
In the Media tab of the Influencer Profile, you will see their average performance on each available social media platform.
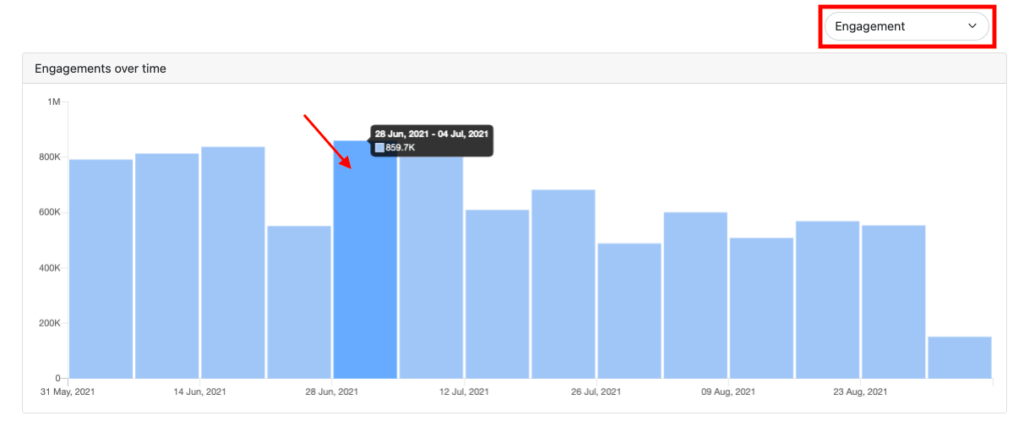
2. Then you can analyse the health of their following by looking at how their followers and engagements changed over time.

3. At the bottom you can see their most recent content, top used hashtags and filter for contents containing those hashtags or for sponsored content. When you filter for specific content on the Influencer Profile, you’ll also see metrics reflective only of the filtered content.
In the “About” tab of the Influencer Profile you will find their demographics along with any private information you may have saved about them. See “How to add or edit influencer information” for more about this.
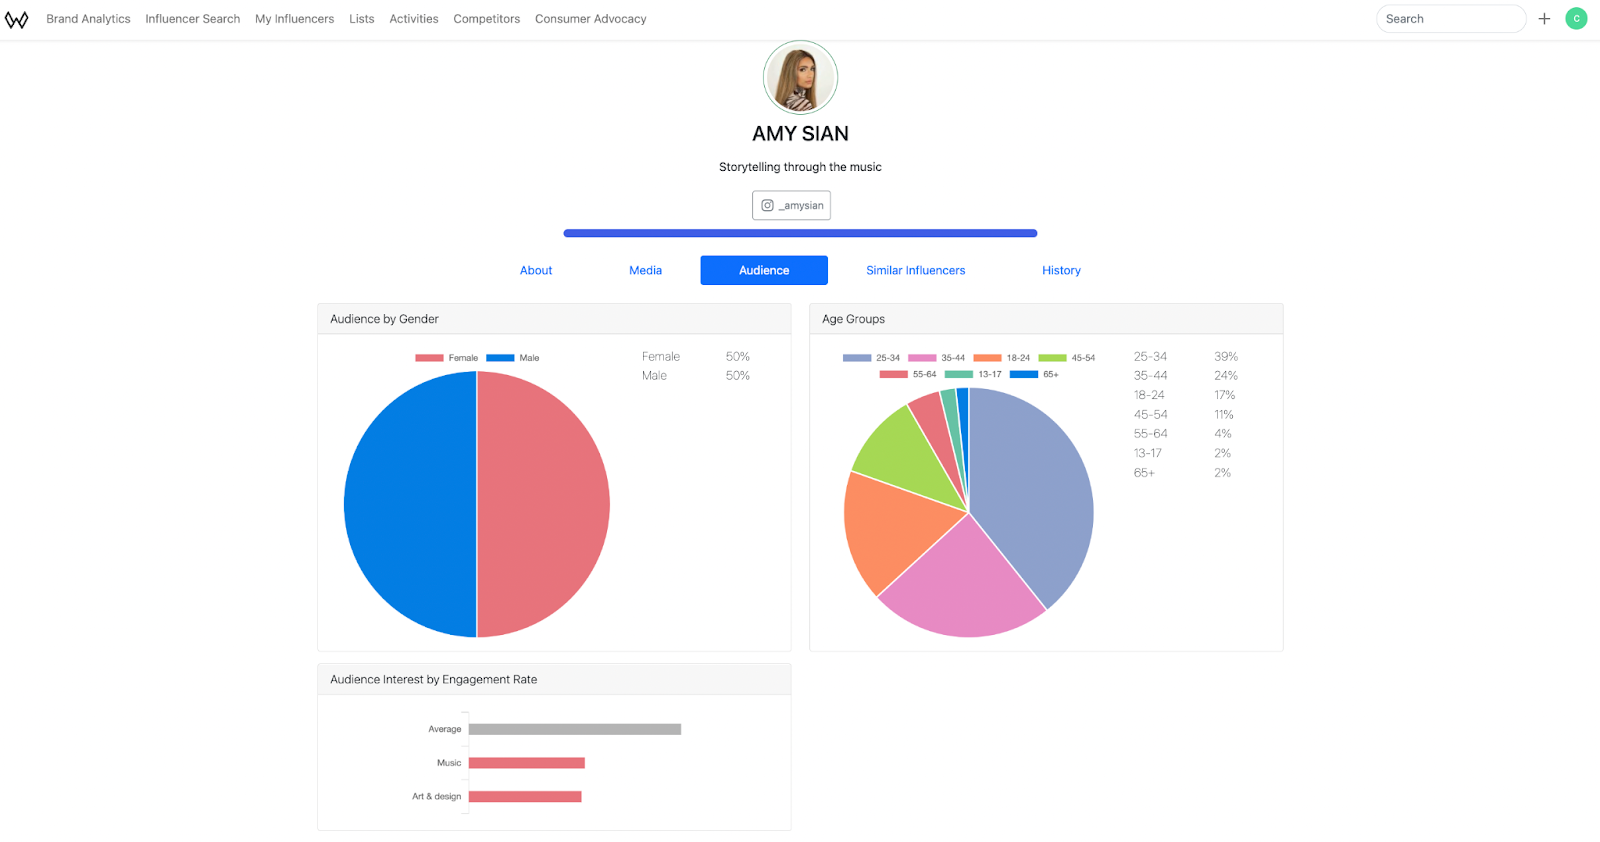
In the “Audience” tab of the Influencer Profile you will find audience demographics such as gender, location, interest, age and most used emojis. Note that age and emoji information is only available for Influencers logged into StoryVault. See “StoryVault” section for more about this.
Based on the influencer’s following, social platforms and demographics, this tab of the Influencer Profile recommends you similar accounts.
If you worked with an influencer before and they are part of your previous Lists and/or Activities, these will be listed on the “History” tab of the Influencer Profile.
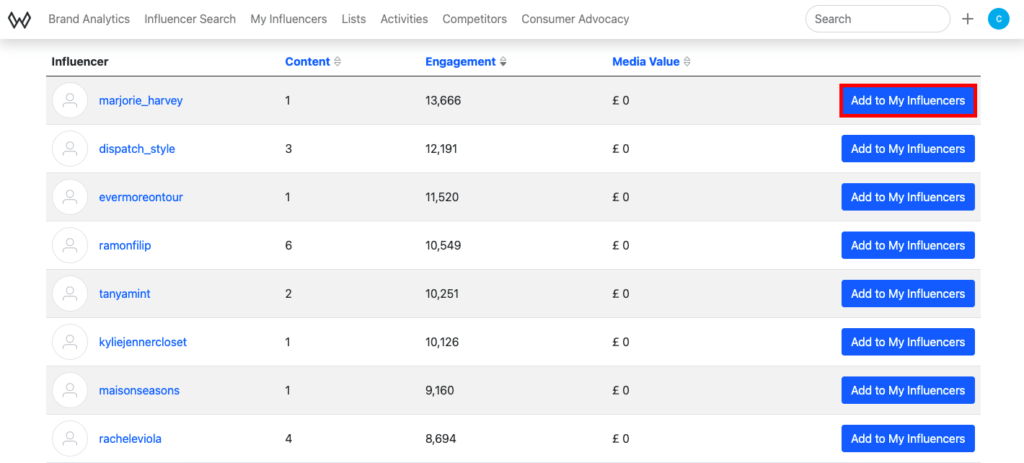
If you like an Influencer Profile and you haven’t added them to your account already, you can do this from their WeArisma Profile by clicking on the ‘Add to my Influencers’ button on the top right of the page.

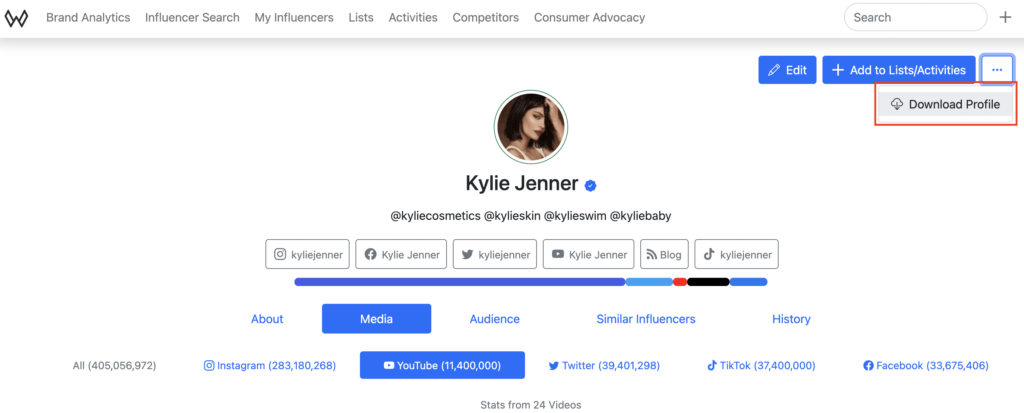
To download a pdf of the Influencer Profile follow the steps below:
This means that the influencer does not have an Instagram business account and therefore we cannot get their data
To add information about your Influencers, you can use the private information available on their profile. You can do this from your “My Influencers” page as follows:

You can also do this from the Influencer Profile as follows:

In your “My Influencers” page:
You can also do this from the Influencer Profile as follows:

The Stories Tracked Influencers dropdown from the My Influencers tab is your team’s full record of Influencers who have Incidental Stories Tracking enabled.
In order to search for an Influencer within your My Influencers list follow the steps below:
*Notably, you can clear your search by pressing the ‘Reset’ button towards the right hand side of the page*
The Influencer Search tab at the top of the WeArisma dashboard is WeArisma’s discovery feature where you can find the right Influencers for your brand or project brief.
E.g. If you wanted to find TikTok Influencers that post fashion content and have a maximum of 200K followers, with a minimum engagement rate of 2%, you could search as seen in the video below:

As seen in the video, each of the selected filters will be shown under the search section. If you get few results, try to relax your search by disabling some of the used filters via the blue “x” sign next to each of them.
This will be pre-populated with your brand terms to show you relevant results for your brand. But you can always replace these terms with new ones of your choice. There are 3 ways to use the Influencer Search bar:
If you would like to view the profile of a specific influencer, simply search by their name or social media handle in the search bar. The results will include Influencers with that name/handle, a similar name/handle or ones who mentioned the handle in their content.
This allows you to search for Influencers who mentioned the hashtags or handles in their content.
If you search for words or word combinations with no “#” or “@” sign, you will get results of Influencers who mention those words in their social media profile caption only.
*Note: if you use more than one term, you should separate them by commas and the results can match one or more of the terms you input*
When you know exactly who you’re looking to find, it’s quickest to use the search bar at the top right of the navigation bar.
Here you can search for an influencer name or handle. The results will show you Influencers with the same or a similar name/handle and any Lists or Activities they belong to.
If no results are found, you will see a suggestion instead that allows you to upload them on the desired social media platform. To see this suggestion you should ensure using the “@” sign in front of the handle.
The Lists tab at the top of the Wearisma dashboard is where you can access features that will help you organise your Influencers into Lists and Folders.
That’s it, you can start adding influencers to your list now!

That’s it, you capn get right to organising your lists into folders now!

All your team members are able to share feedback about the Influencers in your List. To leave the feedback and comments, you can:
You can export a List of Influencers to a CSV file, along with the private information you have saved about them:

There are 3 ways to add Influencers to an existing List:

4. Click on “Upload” and you will see the Influencers being added to your List.


The Brand Analytics tab located at the top of the WeArisma dashboard is where you can search for specific Influencer content by inputting different keywords, hashtags or handles in the search bar.
E.g.: If you wanted to know how #fashion is performing on Instagram amongst your Influencers over the summer of 2021 you would use a search similar to the one seen below:

The result will show you a series of insights:
What does it mean if a piece of content has a blue frame around it?
What does it mean if a piece of content has a green frame around it?
What do the icons at the bottom of a piece of content mean?
If you want to search for more specific content you can use Advanced Search to include or exclude any of the terms you input in the Advanced section of the search bar.
E.g.: If you wanted to see how sustainable fashion performed in the Summer of 2021 starting from your previous #fashion search, you would:
The Activities tab, located on the WeArisma dashboard at the top of the page, is where you can manage and track data about all your Influencer campaigns.
To manage campaigns, you will first need to create a List of Influencers (see the ‘Lists’ section for instructions on how to do this) and then create an Activity as follows:
*Note: this is for your own organisation of Activities and will not affect the way the Activity runs.*
That’s it. We will automatically start tracking mentions from your set of Influencers where they mention your chosen keywords/hashtags/handles.

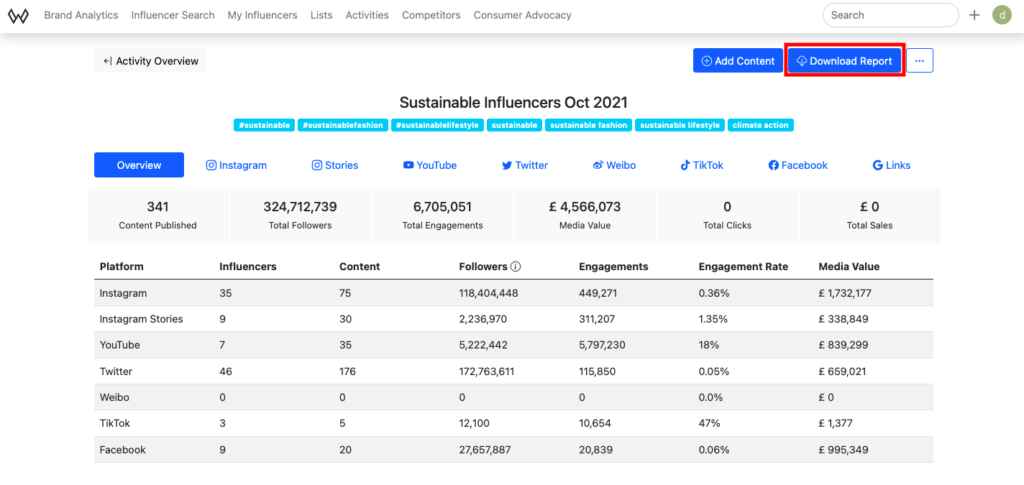
You can do this from your Activity Overview page – the first page you land on when opening one of your Activities. Here you will see a series of insights:
*For CPA and CPC, you need to be using our clicks and sales tracking feature. Refer to the “Clicks and Sales” section below.
How do I set up Clicks and Sales tracking from an Activity?
We can track Clicks and Sales within your Activity with our Google Analytics integration. In order to integrate your Google Analytics account to WeArisma, follow the steps below:
Once you have integrated your Google Analytics account, follow the next steps to setup Clicks and Sales tracking in your Activity:
How do I track my Clicks and Sales after setting it up in an Activity?
There are 2 ways to track stories.
To track stories, Influencers are required to log-in via Facebook, giving us permission to see their Story insights. You can invite your Influencers to log-in as follows:
*Note that we offer personalised log-in pages with your branding for this. If you don’t already have one, email us at to generate one for you.*
When influencers don’t want to log in to StoryVault, you can use our Automatic Story Tracking feature where we manually capture Instagram Stories and input them into the system along with estimated insights based on the Influencer/similar Influencer’s past performance.
There are two ways to enable Automatic Stories tracking:
This will ensure that all your Influencers Instagram Stories will be captured for the duration of the Activity period.
*Note that if you add new Influencers to your activity after you’ve enabled tracking, you will need to do this again for the newly added influencers.*
*Note that you can only use this feature while the Activity is still active (before the end-date) and it will only start Automatically Tracking Stories from the moment you enable it onwards.*
You can edit various things in your Activities to tailor them as necessary.

If you’ve paid the influencers in your Activity, you can input the Spend by following the steps below:
You can also edit the spend per Influencer in the Influencer table at the bottom of the Activity Overview page as follows:
Content Analytics is where you can analyse all content posted within your Activity in detail. To get there click the ‘Content Analytics’ at the top right corner of your Activity Overview page.

Here you will land on the Content Analytics Overview page showing the overall performance breakdown by platform.

You can also see detailed content statistics for each social media platform, by choosing between the different platforms from the menu highlighted above.
To manually upload content (including Instagram Reels) follow the steps below:
*Note: ensure that the content URL has been posted by one of the Influencers in your Activity, and was published within the Activity date-range.*
*Note: that this won’t work for Instagram Stories – see the ‘Add Stories’ section below.*
You can also add Reels as screenshots uploaded to either of the Influencers in your Activity. To do this:
*Note: manually uploaded Reels will be accompanied by Estimated Metrics based on the Influencer/similar Influencer’s past performance. If you have the accurate Statistics from your Influencer you will need to edit these metrics – see the ‘Edit Metrics’ section for instructions.*
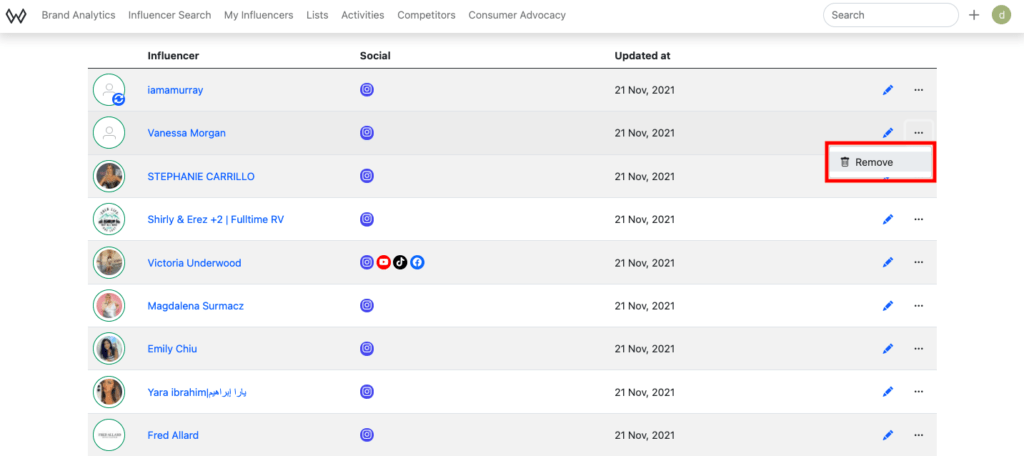
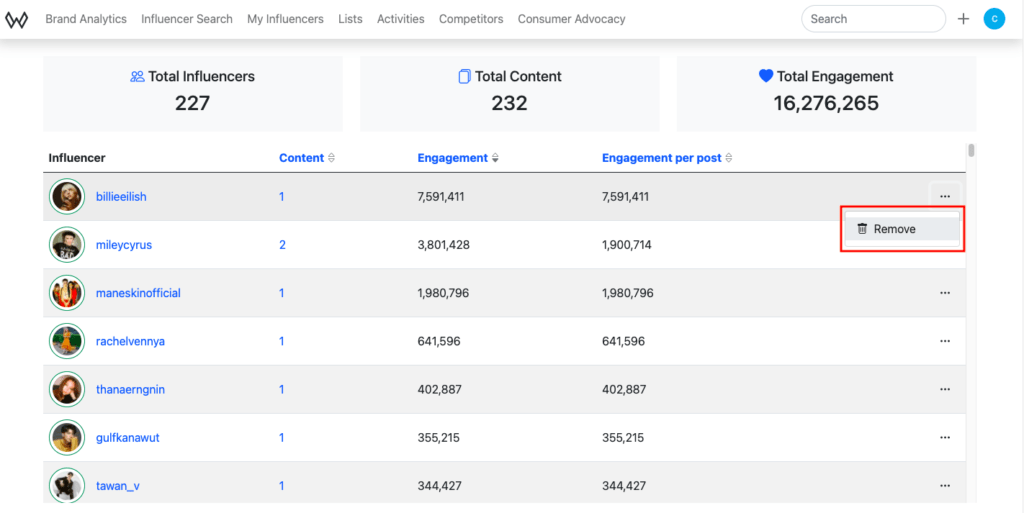
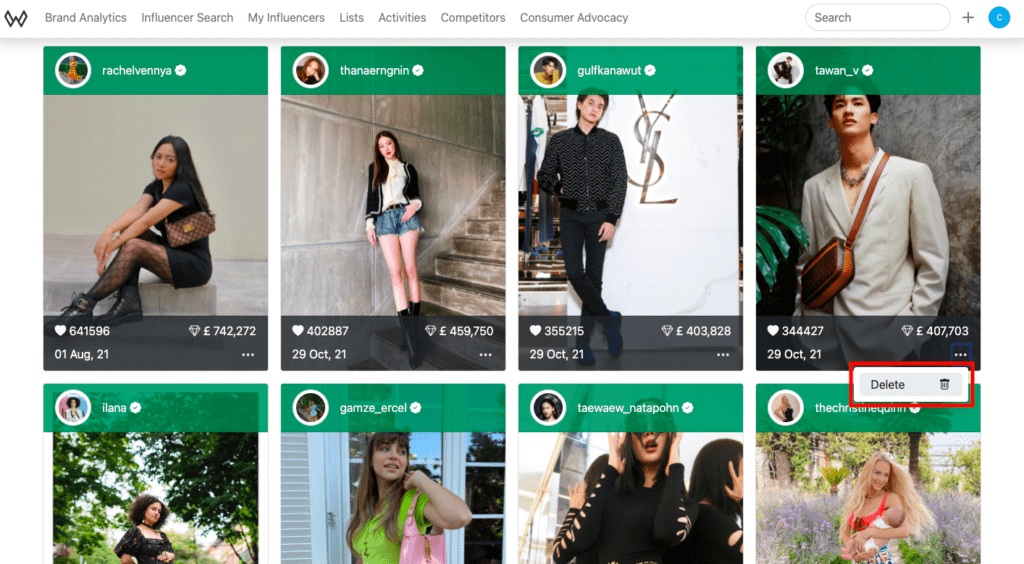
To remove content from your Activity, please follow these steps:
*Notably, when checked the multiple selection checkbox selects only the content that is visible on that page. For example, if the Instagram tab has 3 pages of content you will need to check the multiple selection checkbox for each of these pages to select all the contents.*
Edit Stats (e.g. Reels, Instagram Stories)
To manually edit Content Metrics as seen on Instagram, please follow these steps.
A box will display and you will be able to input or edit the metrics (e.g likes, comments, views, reach, impressions and published date) for your manually uploaded piece of content.
*Notably some metrics are only applicable to certain media types e.g. view = not available for images only video content*
There are two ways that you can Add Instagram Stories to your Activities.

*Note: manually uploaded Stories via screenshot will be accompanied by Estimated Metrics based on the Influencer/similar Influencer’s past performance. If you have the accurate Statistics from your Influencer you will need to edit these metrics – see the ‘Edit Metrics’ section for instructions.*
> Add Stories via Automatic Tracking
If you have Automatic Tracking enabled you can upload any of your Influencer’s Stories, even if they do not contain your campaign hashtags/handles/keywords by following the steps below:

If you would like to distinguish between Paid vs Organic content within your Activity, you can do so by following the steps below:
Additionally, for any content marked as Paid you will also see an icon on the bottom right of the images in the Activity reports.
At the end of each Activity, the platform will generate a pdf report containing all the campaign statistics as well as information about each influencer and each content they posted within your campaign. To download this report:
If you’ve created multiple activities you can also compare them by different metrics.
To do this, please follow the steps below:
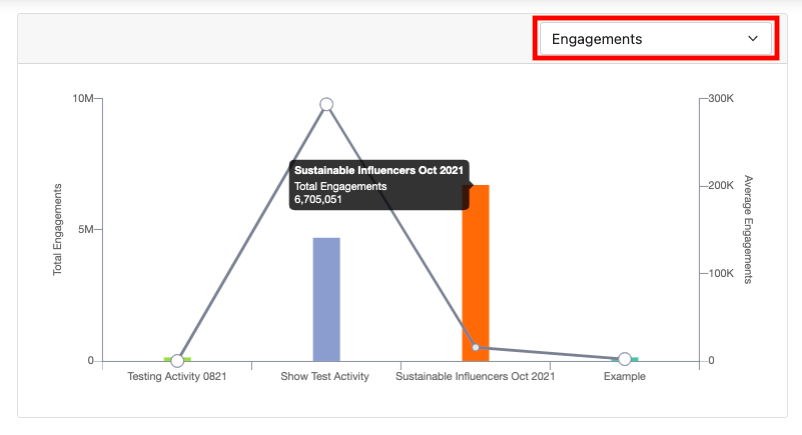
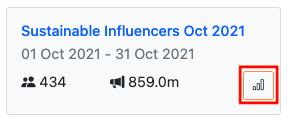
4. To control the Activities shown in the chart you need to use the chart icon on the bottom right of each Activity box on the page. Clicking on this icon will add or remove it from the chart. Note that you can compare up to 5 activities at a time.
With the help of our Google Analytics integration the Conversion Metrics feature allows you to identify which Influencers are driving the highest conversion across all your campaigns in one easy to use dashboard. You can also filter by date range, campaign or Influencer to gain faster insights into real-time performances.
Notably, filtering by date range allows you to measure your growth overtime by enabling you to know which time periods led to the highest conversion. E.g. Comparing top Black Friday sales and conversion drivers in 2020 vs 2021.
The Conversion Metrics dashboard acts as an overview for Clicks and Sales data across all Activities, therefore the first crucial step in being able to utilize the Conversions Metrics dashboard is to integrate your Google Analytics account with WeArisma and to begin making use of the Clicks and Sales tracking feature.
We can track Clicks and Sales within your Activity with our Google Analytics integration. In order to integrate your Google Analytics account to WeArisma, follow the steps below:
Once you have integrated your Google Analytics account, follow the next steps to setup Clicks and Sales tracking in your Activity:
To view a specific Influencer’s conversion rates, please follow the steps below:
You will then be presented with the conversion metrics for the Influencer(s) you selected during your search showing you: which Activities the Influencer is in (you can also see the Activity names by clicking the ‘i’ icon), the Influencers Clicks, Sessions, Transactions, Sales, Conversion and Average Transaction.
To view a specific Activity’s conversion rates, please follow the steps below:
You will then be presented with the conversion metrics for the Activity(ies) you selected during your search showing you: which Influencers are in your chosen Activity(ies) (you can also see Activity names by hovering over the ‘i’ icon next to the Influencer’s name), the Activity(ies) Clicks, Sessions, Transactions, Sales, Conversion and Average Transaction.
To view a Conversion Metrics within a specific date please follow the steps below:
*Notably you will only see Influencers who have related metrics within the results. Influencers who have no clicks, sales etc will not be shown in the search results*
The Automatic Stories Tracking allows you to view, filter and manage all of your Influencer’s Instagram Stories even after the 24hr window has ended. Here your Influencer’s Story Statistics are ensured to be accounted for in your campaign success – even if they don’t tag you!
Automatic Stories Tracking also safely stores all of your Influencer’s past, present and future Instagram Stories in one place, which saves you time going back and forth to try and locate that missing piece.
The Automatic Stories Tracking feature allows you to see all of your Influencer’s Instagram stories.
Search for an Instagram Story from a specific Influencer
You will then be presented with all the Instagram Stories for that Influencer within the time period of the search.
*Note: You can also select your Influencers by Activity using the ‘Select Influencers by Activity’ dropdown and selecting the Activity name that your Influencer is in*
You can highlight stories from specific Activities using the Automatic Stories Tracking feature by following the steps below:
If you’ve logged in with your Facebook page via WISPR, you can see all of your Instagram tagged mentions in the Consumer Advocacy tab of the top navigation bar.
You can also filter for more specific tagged mentions. To do this follow the steps below:

Once you’ve defined your Search, you will see a series of insights on the page:

You can also save content that you like, this will be surfaced on your “Saved” page.
To see all of your saved content, click on “Consumer Advocacy” in the top navigation menu and select “Saved” from the dropdown. This page will show you a series of insights reflective only of the content you saved:

The settings page allows you to change your default search preferences, change your password, view your usage and integrate Google Analytics.
In order to access the ‘Settings’ page:
The Preferences tab allows you to change the default search settings which appear on your Brand Analytics page. In order to change these settings follow the steps below:
The Account tab allows you to change your WeArisma password, which can be done by following the steps below:
The Usage tab allows you to check your Team’s usage and limits, which can be done by following the steps below:
The Team tab allows you to check your Team’s users, which can be done by following the steps below:
How can I delete a user from my Team?
The Integration tab allows you to link your Google Analytics account to my WeArisma account, which can be done by following the steps below:


Our guide to Engagement Rates can be found here:
‘Is this good?’ Your definitive guide to Engagement Rates

Media value is computed based on an average rate card of an influencer with a certain level of following and engagement across platforms, by sector and geography, similar to how media value is computed for print. For example, if a brand is covered by a magazine in a double-page spread, it is as if the brand received the media value equivalent to the rate card charged by the magazine. The calculation is similar for influencers.
Factors include followers of the influencer who posted, engagement of the post and the values tied to each of these factors based on industry averages, dynamically adjusted by weightings depending on sectors, social platforms etc.
There are 2 solutions available on the WeArisma platform to track stories:
If your Influencer hasn’t logged into StoryVault you can upload screenshots of their Instagram Stories by following the steps below:
*Note: manually uploaded Stories via screenshot will be accompanied by Estimated Metrics based on the Influencer/similar Influencer’s past performance. If you have the accurate Statistics from your Influencer you will need to edit these metrics – see the ‘Edit Metrics’ section for instructions.*
Check-in on your Activity, scrolling past the charts to the list of Influencers. If you see a green lock symbol next to an Influencer’s name, they have logged into StoryVault.

The red lock next to an Influencer’s name means they were at one point logged into StoryVault, but either unlinked their account or the access expired due to inactivity. You’ll just need to ask them to re authenticate their account using the relevant StoryVault link.
Our Clicks & Sales Tracking allows you to seamlessly integrate your Google Analytics into WeArisma, in order to see clicks and sales for each influencer in your campaign. Simply generate a link within your Activity, give it to your Influencers to use on Swipe Ups or YouTube videos, and check back in to see the results.
Our guide to measuring the cost and impact of Influencers can be found here:
‘Is this good? Your definitive guide to measuring the cost and impact of your influencers
If an influencer has hidden their likes, the platform will not be able to pull this data in. However, if you have the likes from the Influencer you can upload them using the following steps below:
A box will display and you will be able to input or edit the metrics and input the likes for the desired piece of content.
Alternatively, you can use the estimations that are provided by WeArisma when a piece of content is manually uploaded.
Estimated metrics are calculated based on a variety of factors including the Influencer’s previous social media performance (e.g. likes, comments, engagements) in combination with to how other Influencers with similar metrics compare.
Our audience model works by reviewing the most recent likes and comments on an Influencer’s posts to show a reflection of who is currently engaging with an Influencer’s content. We can then see the age, gender split, most commented emojis to show sentiment and which topics are of interest.
Still haven’t found a suitable answer? Contact our Client Success Team!